Yesterday, I
wrote about how to organize and brainstorm ideas for color poetry. Now it is time to draft and publish!
wrote about how to organize and brainstorm ideas for color poetry. Now it is time to draft and publish!
To actually write the color poetry
is very easy. I have students look at their Renaming Crayons sheet and choose
their 3-5 ideas. If I were to do this activity in second grade would most likely
choose 3, and in fourth grade I would chose 5 ideas.
Then drafting is simple! Students
start the poem with the color and then each of their color names is one
line. The poem ends with the color
again. Here is an example:
Green
By Mandy Gregory
Green
Freshly cut grass
Little inchworm scooting
up a leaf
up a leaf
Spring time bugs
Green
We talk
about what would create the best look, rhythm and beat since it is poetry. I personally like to guide students to using
the longest line in the middle and building up to it and then going back to
smaller phrases. For example in the
Green poem it is 1 line, 3 lines, 6 lines, 3 lines, 1 line. The lines don’t have to have the same number
like the 2nd and 4th lines- that was just chance.
Then I have
students neatly recopy the poem and go over it with black pens. Students then cut around the poem.
students neatly recopy the poem and go over it with black pens. Students then cut around the poem.
To publish I
then do what I call “Name Artwork.” I have
no idea if it really has a name, it is just something I made up. Students use a big marker to write their
names in large (side to side) block letters as they turn the page. Students need a larger marker and white
computer or construction paper.
then do what I call “Name Artwork.” I have
no idea if it really has a name, it is just something I made up. Students use a big marker to write their
names in large (side to side) block letters as they turn the page. Students need a larger marker and white
computer or construction paper.
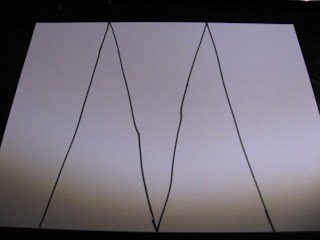
For example,
for my name I would start with the M going from the top to the bottom of the
paper.
for my name I would start with the M going from the top to the bottom of the
paper.
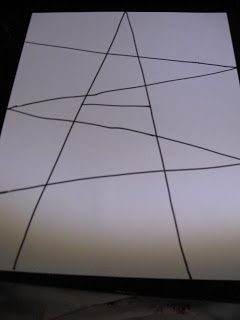
Then I rotated the paper and drew
the A, once again in large block letters from the top to the bottom of the page.
the A, once again in large block letters from the top to the bottom of the page.
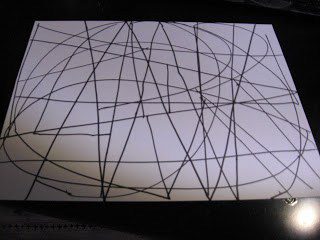
I kept on rotated the page and writing the
letters until the paper looked like this. Sometimes I wrote the letter off
center to add more lines to the sides of the paper. Then I connected any lines that where in the
middle of the white spaces. The final
result was this:
letters until the paper looked like this. Sometimes I wrote the letter off
center to add more lines to the sides of the paper. Then I connected any lines that where in the
middle of the white spaces. The final
result was this:
Now it is time
to break out the colors! I once again
pull out the baggies of crayons from the HUGE box of crayons. Students then color in each box a different
color from the baggie- I don’t care if mine use the exact ones from the
Renaming Crayons sheet. I just let them
use a variety of colors. I do encourage
them to not let the same colors “touch.”
When students finish coloring, then the glue the poem in the center.
This is a perfect
activity after a long day of testing because it is so mindless AND they look
great in the hall!
activity after a long day of testing because it is so mindless AND they look
great in the hall!
Mandy Gregory is a 2007 and 2012 Teacher of the Year. She has taught Kindergarten- 4th grades in both the general education and inclusion settings. She is currently a 1st grade Special Education teacher. She is the owner and creator of Mandy’s Tips for Teachers website (www.mandystipsforteachers.com) and has over 13 years of teaching experience. She is married with two beautiful children.


I like this!